


The Top 9 Differences Between G Suite and Google Workspace
March 2, 2023
How to Use Google Workspace Visitor Sharing for External Collaboration
March 2, 2023
Setting up MX, DKIM, and TXT records on Google is crucial for businesses that want to ensure their emails are secure and delivered in a timely manner. It’s an essential step for any company that uses Google as its email provider.
If you follow the step-by-step guide in this article, you can easily and quickly configure your MX, DKIM, and TXT records on Google. By following these steps, you can ensure that your emails are sent securely and quickly and that you have the best protection against malicious actors. You’ll also be able to take advantage of the many features that Google’s email platform, Google Workspace offers. So let’s get started and see how to set up MX, DKIM, and TXT records on Google. But before we configure the records we need to understand what these records are.
What are MX / DKIM / TXT records?
MX records
MX records direct emails to a mail server. The MX record indicates how email messages should be routed in accordance with the Simple Mail Transfer Protocol (SMTP, the standard protocol for all emails). MX records must always point to another domain.
An example of an MX record
| example.com | record type | priority | value | TTL |
|---|---|---|---|---|
| @ | MX | 10 | mailhost1.example.com | 45000 |
| @ | MX | 20 | mailhost2.example.com | 45000 |
The ‘priority’ numbers before the domains for these MX records indicate preference; the lower ‘priority’ value is preferred. The server will always try mailhost1 first because 10 is lower than 20. In the case of a message send failure, the server will default to mailhost2.
We should always configure more than one MX record. This will ensure that the mail server always sends the mail to the respective mail server. These extra MX records are called backup MX records. A backup MX record is just an MX record for a mail server with a higher ‘priority’ value (which means a lower priority) so that under normal circumstances mail will go to the more prioritized servers. In the first example above, mailhost2 would be the ‘backup’ server because email traffic will be handled by mailhost1 as long as it is up and running.
TXT records
The DNS ‘text’ (TXT) record lets a domain administrator enter text into the Domain Name System (DNS). The TXT record was originally intended as a place for human-readable notes. However, it is also possible to put machine-readable data into TXT records. One domain can have many TXT records. Today, two of the most important uses for DNS TXT records are email spam prevention and domain ownership verification. The format was simply the attribute and the value contained within quotation marks (“) and separated by an equal sign (=), such as “attribute=value”
Example of a TXT record
| example.com | record type | Value | TTL |
|---|---|---|---|
| @ | TXT | “v=spf1 include:_spf.google.com ~all” | 32600 |
Spammers often try to fake or forge the domains from which they send their email messages. TXT records are a key component of several different email authentication methods that help an email server determine if a message is from a trusted source. Common email authentication methods include Domain Keys Identified Mail (DKIM), Sender Policy Framework (SPF), and Domain-based Message Authentication, Reporting & Conformance (DMARC). By configuring these records, domain operators can make it more difficult for spammers to spoof their domains and can track attempts to do so.
Here is a brief description of each TXT record described above:
- DomainKeys Identified Mail(DKIM): this is a digital cryptographic signature that is added to outgoing message headers in order to prevent spoofing. This is done by generating a private domain Key to encrypt outgoing mail headers and by adding a public key to your DNS. DKIM works to create a unique digital signature for your domain that identifies emails genuinely originating from your domain and protects against Email Spoofing. Email spoofing is the forgery of an email header so that the message appears to have originated from someone or somewhere other than the actual source. Email spoofing is a tactic used in phishing and spam campaigns because people are more likely to open an email when they think it has been sent by a legitimate source.
- Sender Policy Framework(SPF): is a DNS record added as TXT into a domain’s DNS that identifies which mail servers, domains, IPs, and MX among others, are permitted to send an email on behalf of your domain. Its purpose is to prevent spammers from emailing forged addresses to your domain. This also becomes necessary when you have applications, systems, etc. sending emails to your users for purposes of internal notifications, of course. Such needs to be defined as part of your SPF policy and not broadly left to the public to restrict and protect cases of spam
- Domain-based Message Authentication, Reporting, & Conformance (DMARC): is a technical specification to help reduce the potential for email-based abuse. DMARC standardizes how email receivers perform email authentication using the well-known SPF and DKIM mechanisms. The way it works is to help email receivers determine if the message “aligns” with what the receiver knows about the sender. As such, in order for that to work, the domain needs to have a published SPF and DKIM.
For mail servers such as Google Workspace to send emails using a specific domain, we have to configure our domain servers to use the appropriate mail records. These records are the MX and TXT records. Google Cloud already provides a DNS management service called Cloud DNS. Cloud DNS is an exceptional service that enables users to manage their DNS records and direct the domains to their mail servers.
What is Google Cloud DNS?
For us to understand what Cloud DNS is and what it does, we should know what DNS records are. A good example is the IP address, 142.251.46.206. This is a record that computers can understand and map traffic to a specific server on the internet, but for human beings, this record is difficult to understand and remember. For human beings to send their traffic to the internet, they need a name they can easily remember, such as google.com. This is where DNS records come into play, DNS is a hierarchically distributed database that lets you store IP addresses and other data, and look them up by name.
Cloud DNS is a high-performance, resilient, global Domain Name System (DNS) service that publishes your domain names to the global DNS in a cost-effective way. Cloud DNS lets you publish your zones and records in DNS without the burden of managing your own DNS servers and software.
Cloud DNS offers both public zones and privately managed DNS zones. A public zone is visible to the public internet, while a private zone is visible only from one or more Virtual Private Cloud (VPC) networks within Google Cloud that you specify. For detailed information about zones, see DNS zones overview.
Cloud DNS supports Identity and Access Management (IAM) permissions at the project level and at the individual DNS zone level. For information about how to set individual resource IAM permissions, see Create a zone with specific IAM permissions.
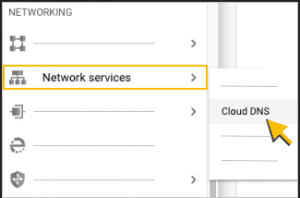
How to access Cloud DNS
- Sign in to your Google Cloud console.
- Click Menu ⇒ Network services ⇒ Cloud DNS
- Either open an existing DNS zone or click Create zone to create a new one.
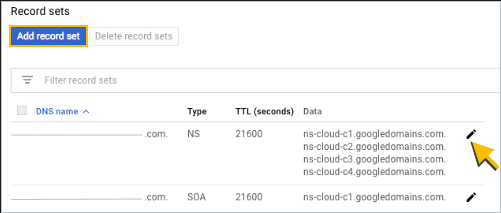
How to add MX Records to Cloud DNS
- Verify that you own your domain.
- Create user accounts in Google Workspace for your team. By doing so we will be able to direct our customers to the new mail servers that we have added.
Once this is done, we can continue setting up the MX records.
- Either open an existing DNS zone or click Create zone to create a new one.
- Choose the option that matches your situation:
- If you don’t have any existing MX records in this zone, click Add record set, then follow the steps in To add new MX records from the Create record set page, below.
- If you have existing MX records in the zone that you want to change to Google MX records, click Edit “”, then follow the steps in to change existing MX records from the Edit record set page, below.
5. To direct your email to your Google Workspace account, you have to add new MX records to your domain. These are the records that you need to add:
| MX server address | Priority |
|---|---|
| ASPMX.L.GOOGLE.COM | 1 |
| ALT1.ASPMX.L.GOOGLE.COM | 5 |
| ALT2.ASPMX.L.GOOGLE.COM | 5 |
| ALT3.ASPMX.L.GOOGLE.COM | 10 |
| ALT4.ASPMX.L.GOOGLE.COM | 10 |
We should add each record indicated above by following the steps below:
- In the DNS Name field, enter @ or leave the default entry.
- From the Resource Record Type list, select MX.
- In the TTL field, enter 3600 or lowest value i,e 300
- In the TTL Unit field, select seconds.
- In the Preference and mail server field, enter the first MX record shown in the table above. Enter the priority number first, then a space, then the MX server address. For example, for the first record, enter: 1 aspmx.l.google.com
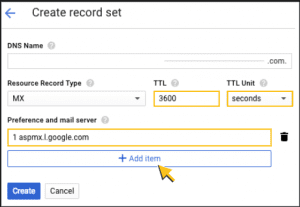
- Click Add item.
- In the second Preference and mail server field, enter 5 alt1.aspmx.l.google.com.
- Click Add item.
- Repeat steps 7 and 8 until all of the priorities and MX records from the table above have been added.
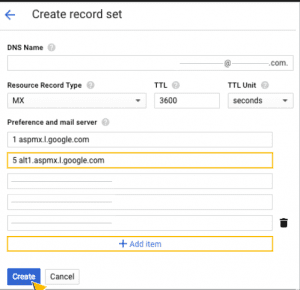
- Click Create. Your new MX records are shown on the Zone details page.
The new records can take up to 72 hours to propagate across the internet, depending on your DNS hosting provider. It might be less than 72 hours, but during this time, mail sent to your email domain might bounce. Until then, you’ll keep getting messages from your previous email service provider. NOTE: Adding a lower TTL value reduces the time for your records to propagate we would advise you to set 300 Seconds as the TTL Value.
How to add SPF to Cloud DNS
- Create a TXT record for SPF. The record is a line of plain text, listing tags and values. The TXT record must include the IP addresses of all your mail servers and all domains controlled by your organization. There are very useful resources that are available on the internet such as mxtoolbox. If all email from your organization is sent from Google Workspace, use this line of text for your TXT record: v=spf1 include:_spf.google.com ~all
- Navigate to DNS settings in your domain’s management console.
- Add a new TXT record using the TXT record value from Step 1. Enter these values:
| Field name | Value to enter |
|---|
| Type | TXT |
| Host | @
Note: If you’re adding an SPF record for a subdomain, enter the subdomain instead of @. Read Apply an SPF record to the subdomain with the Host setting for more information. |
| Value | v=spf1 include:_spf.google.com ~all |
| TTL | 300 |
How to add DKIM to Cloud DNS
- Generate the record from Google Workspace. Here is a quick link on how it can be generated. In order to configure the DKIM record correctly we can use a DKIM record splitter such as mailhardener. It splits the DKIM generated by Google Workspace into a record that is configured to Cloud DNS.
- Navigate to DNS settings in your domain’s management console.
- Add a new TXT record using the TXT record value from Step 1. Enter these values:
Enter these values to add DKIM to Cloud DNS
| Field name | Value to enter |
|---|
| Type | TXT |
| Host | google._domainkey |
| Value | “v=DKIM1;k=rsa;p=MIGfMA0GCSqGSIb3DQEBAQUAA4GNADCBiQKBgQDeIhtCv3vUinyhKiKtZ8efjHGGo8gE1T+o7gLrvo6yRtdz9ICe6Fz5sgz0WYFW5nCV4DmaTcS25TfgWKsLggGSBdDxzShyvgdKJkG3b4+73rT/5opnRceqQf1qndnMZfkb/0/YciMKNQmigj9IGwKypj6CoIr1s46jRGy4Ws7LQIDAQAB” |
| TTL | 300 |
Please note that it might take up to 24 hours for the value to be authenticated by Google.
How to add DMARC to Cloud DNS
Google has made it easy to add DMARC records to your Google Cloud DNS. After preparing the text of your DMARC record, add or update the DNS TXT record at your domain provider. To update a DNS TXT record, enter the line of text that defines your DMARC policy record in the management console for your domain provider. If you have more than one domain, take the steps below for each domain. Each domain can have a different policy, and different report options (defined in the record).
If you don’t create DMARC policies for subdomains, they inherit the parent domain’s DMARC policy. To define a DMARC policy for subdomains, use the sp policy tag in the DMARC record for the parent domain.
Please note: Configure DomainKeys Identified Mail (DKIM) and Sender Policy Framework (SPF) before configuring DMARC. DKIM and SPF should be authenticating messages for at least 48 hours before turning on DMARC.
- Have the text file or line that represents your policy record ready.
- Sign in to the management console for your domain host.
- Locate the page where you update DNS records.
- Add a DNS TXT record, or modify an existing record, by entering your record in the TXT record for _dmarc:
-TXT record name: In the first field, under the DNS Host name, enter: _dmarc.domain.com
-TXT record value: In the second field, enter the text for your DMARC record, for example: v=DMARC1; p=none;
The field names might be different for your provider. DNS TXT record field names can vary slightly from provider to provider. The domain used here is an example domain. Replace domain.com with your own domain. - Save your changes.
Every time you change your DMARC policy and update your record, you must update the DNS TXT record at your domain provider.
| Field name | Value to enter |
|---|---|
| Type | TXT |
| Host | _dmarc.domain.com |
| Value | v=DMARC1; p=none; |
| TTL | 300 |
Conclusion
Now you can send emails with confidence that they will be delivered properly. You’ll want to regularly monitor your MX, DKIM, and DMARC records to ensure they remain accurate and up-to-date. As your business evolves, you may want to use a different email provider. When that time comes, you’ll be able to easily transfer your records to a new provider.